
Step-by-Step Guide
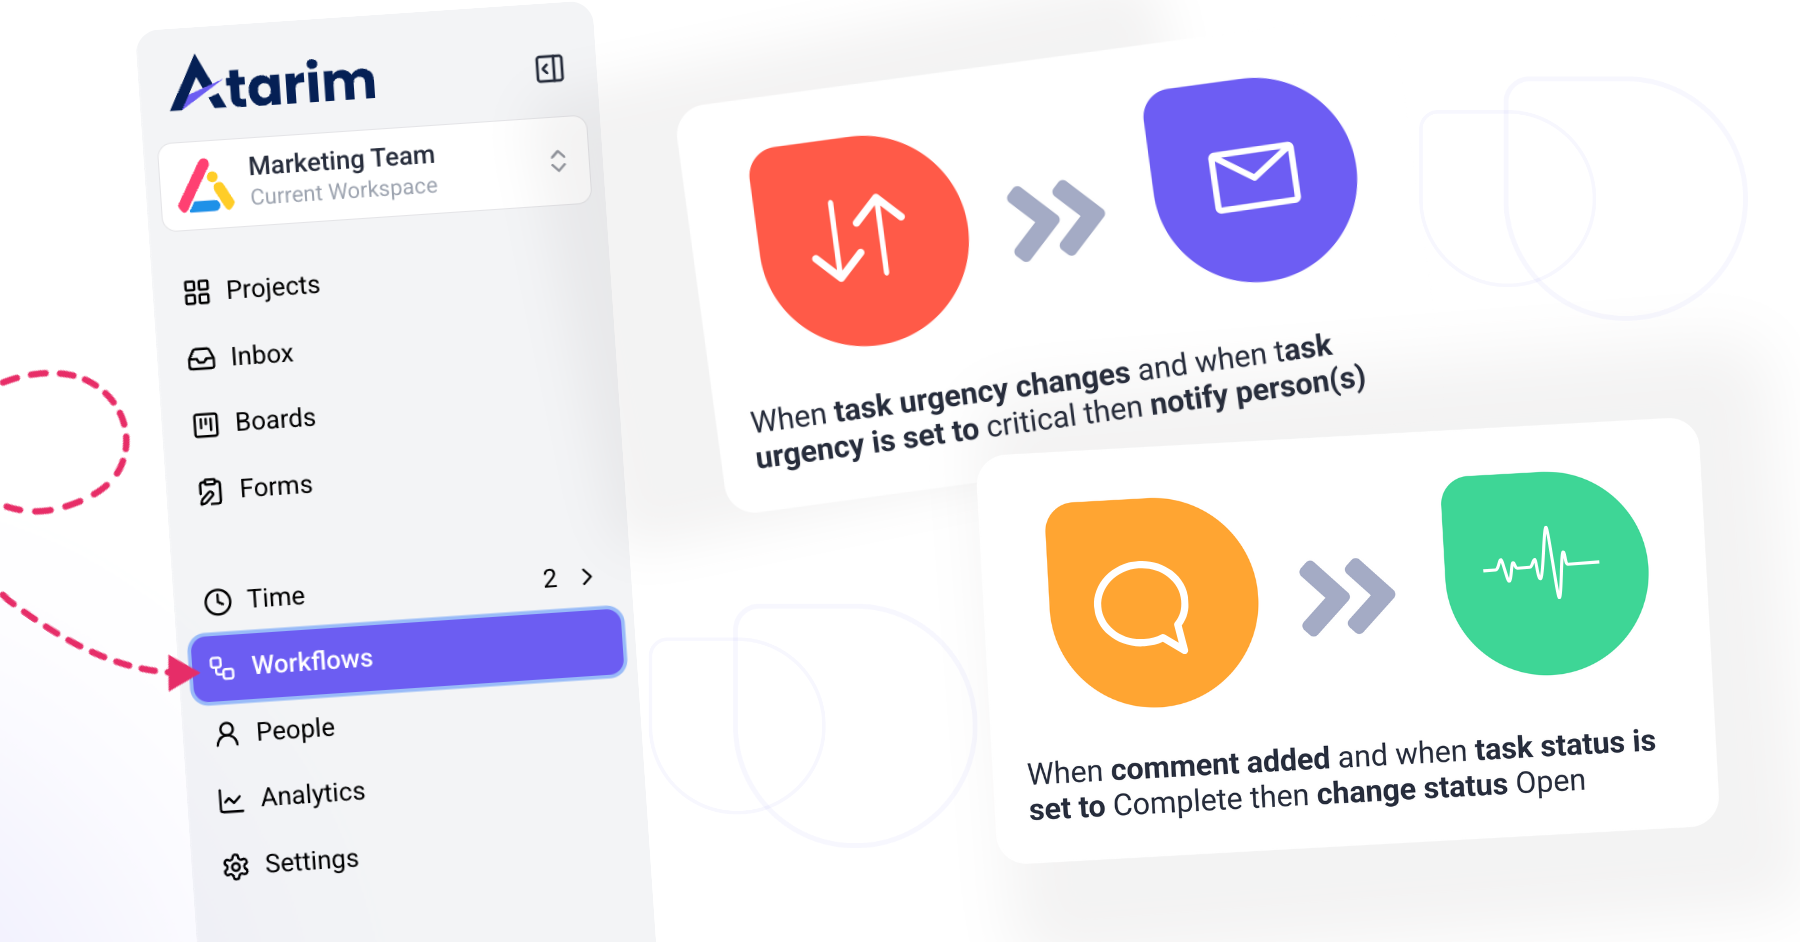
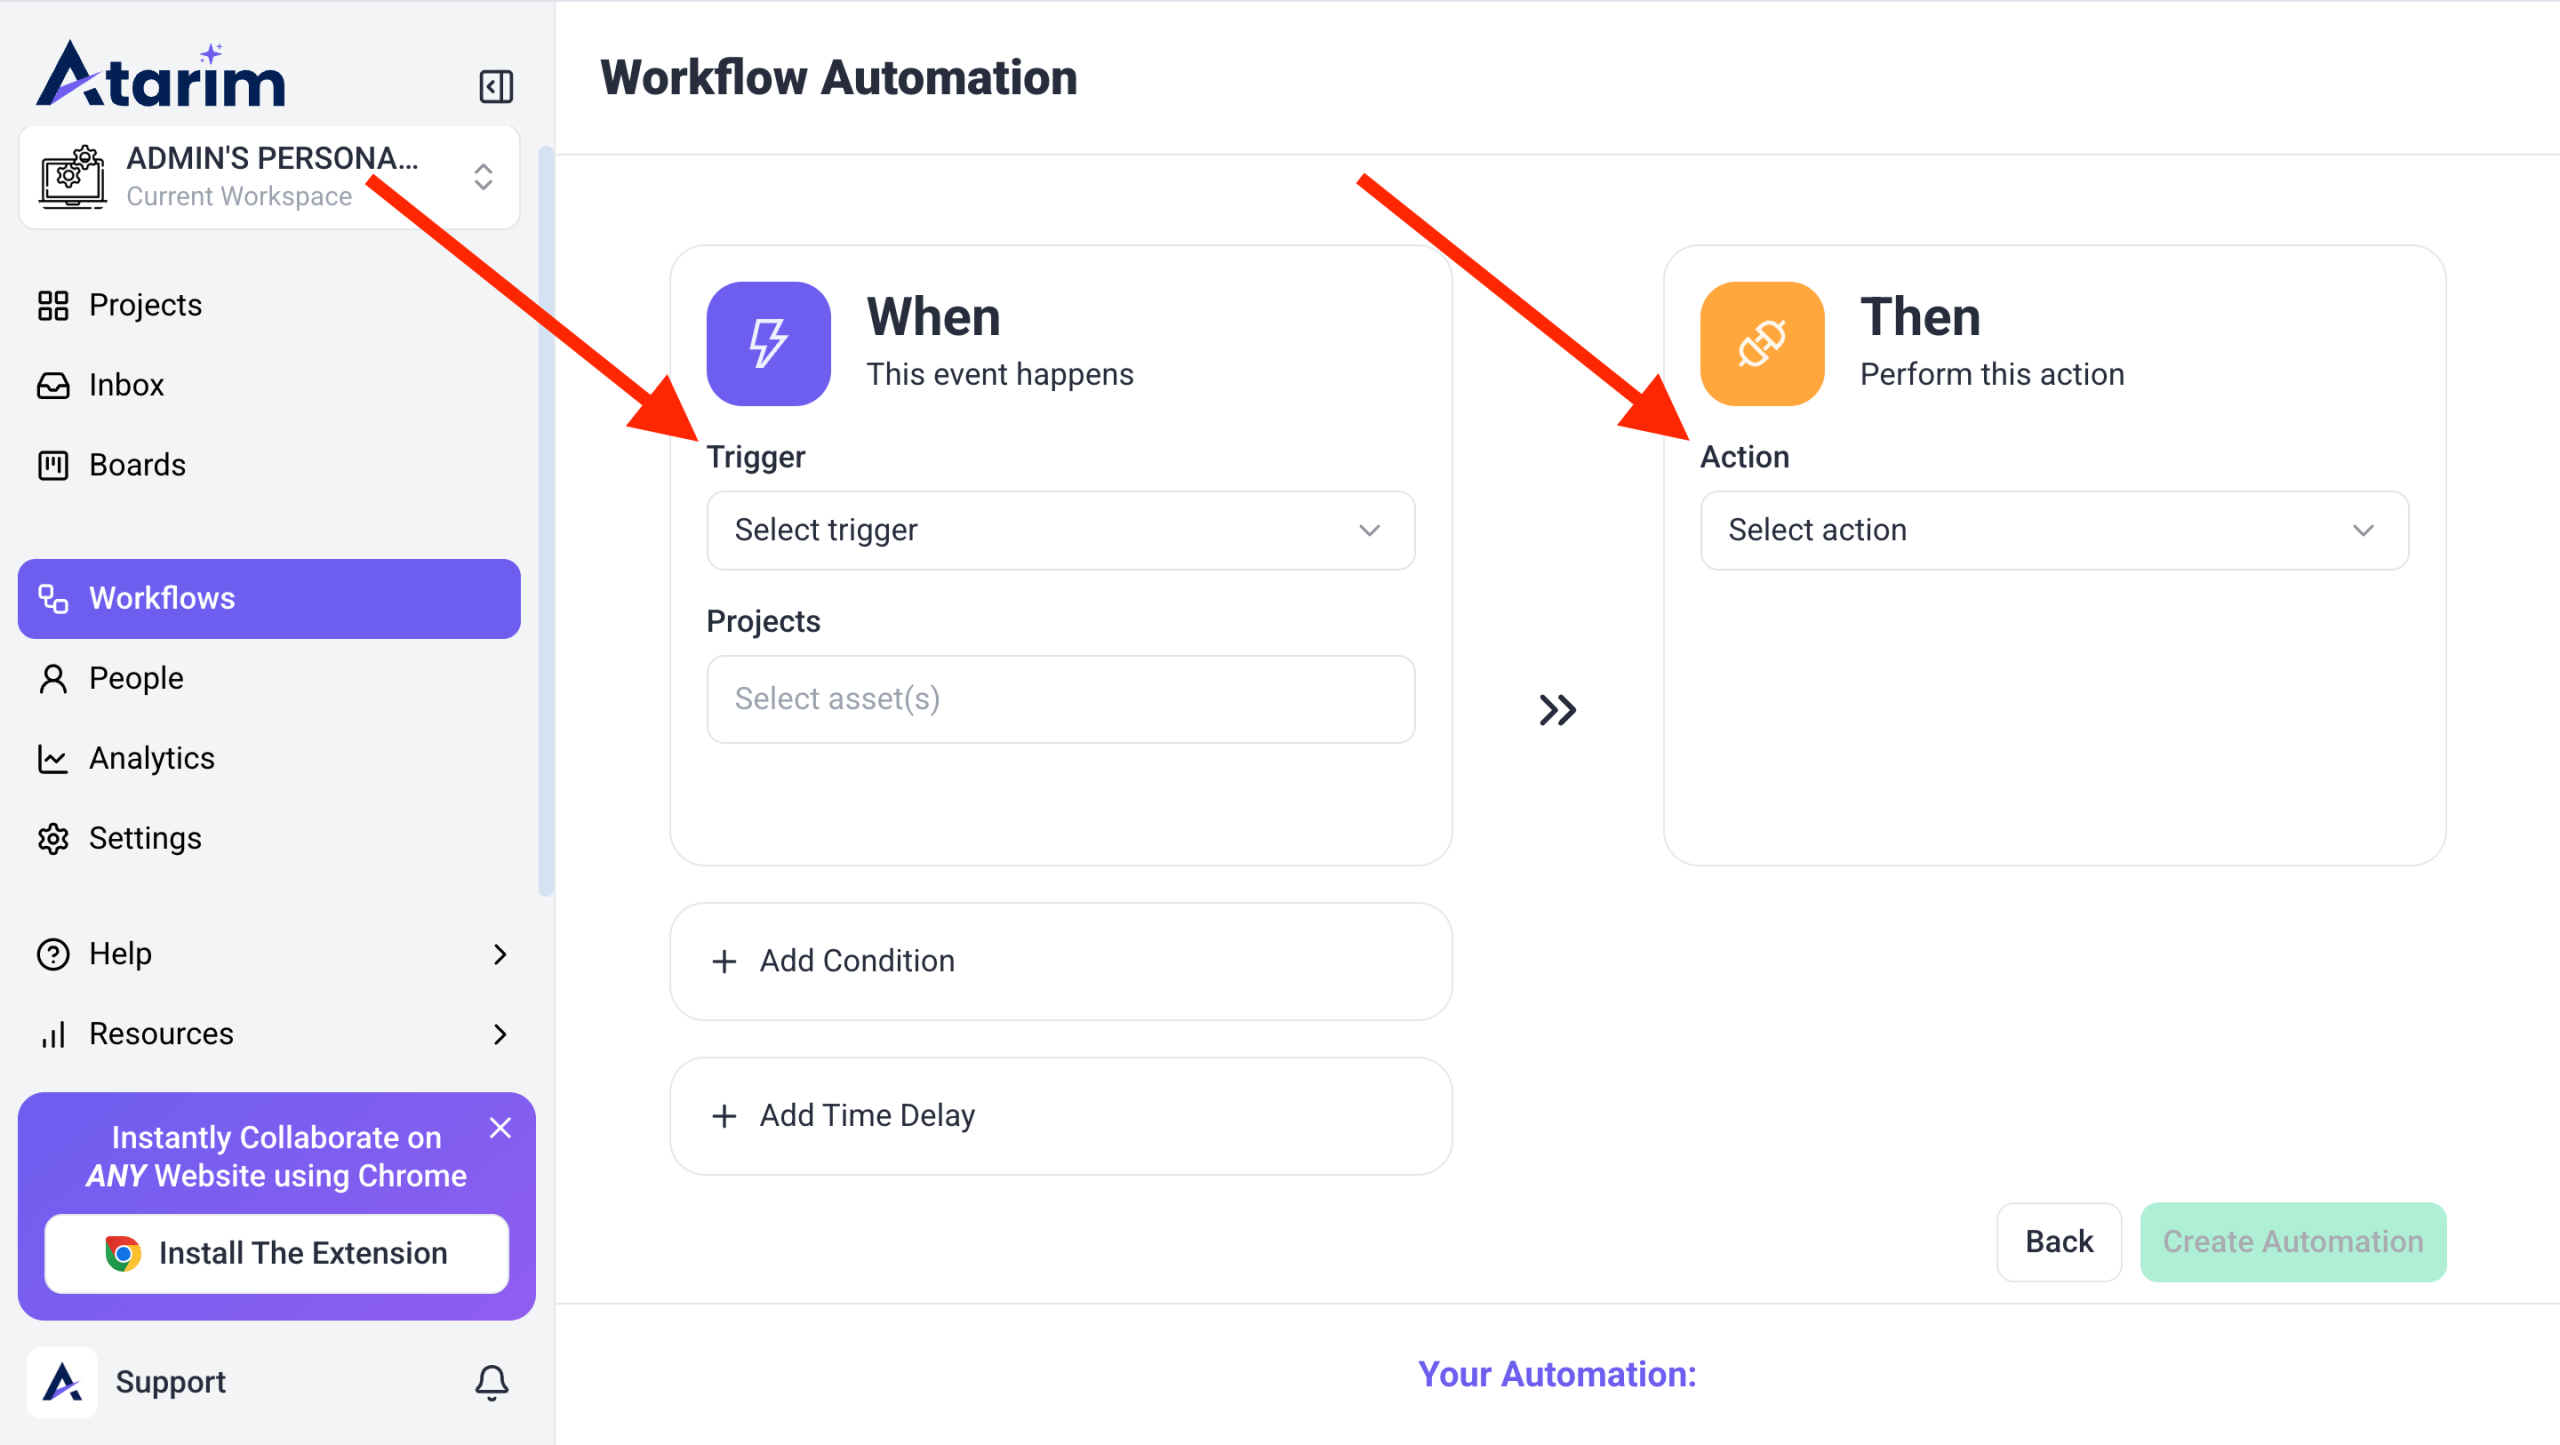
Step 1: Navigate to Workflows
Tip: If you don’t see the Workflows tab, check your permissions or ask an admin for access.
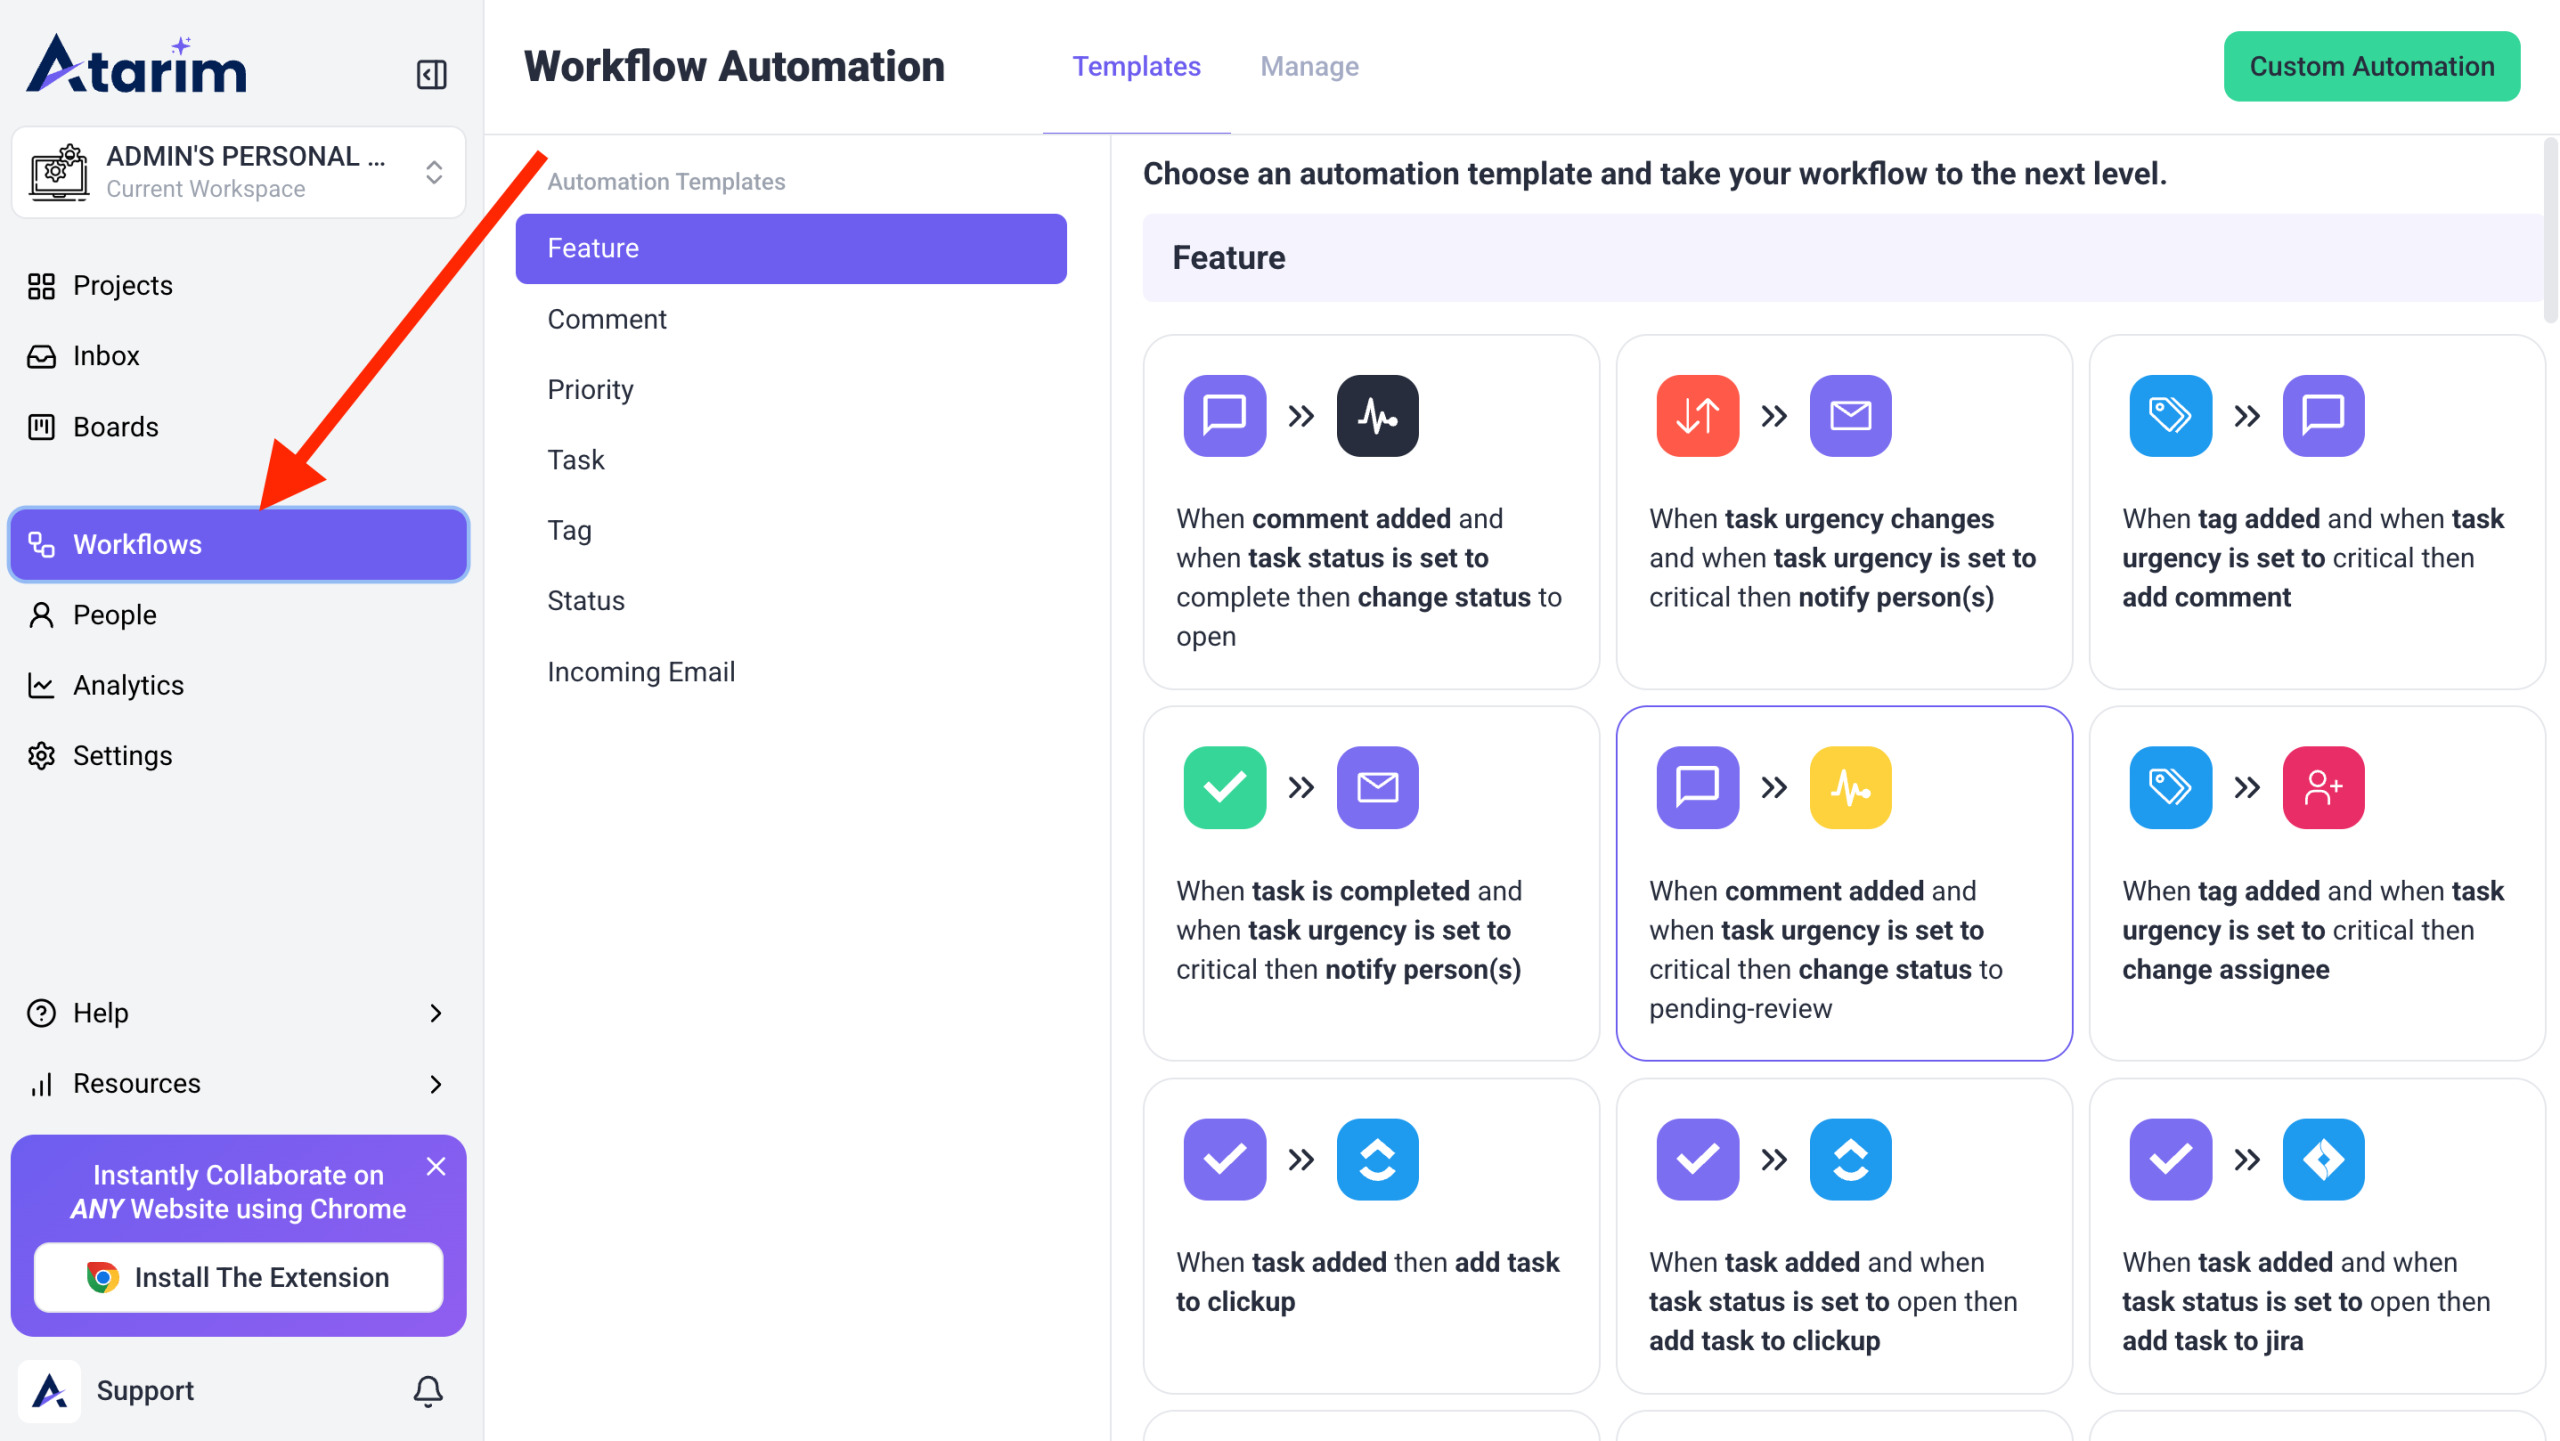
Step 2: Create a New Automation Rule
- On the Workflows screen
- Click Custom Automation in the Workflows menu or
- Choose from predefined automation rules or create a Custom rule

Note: Predefined rules are great for common workflows like task updates, notifications, and integrations.
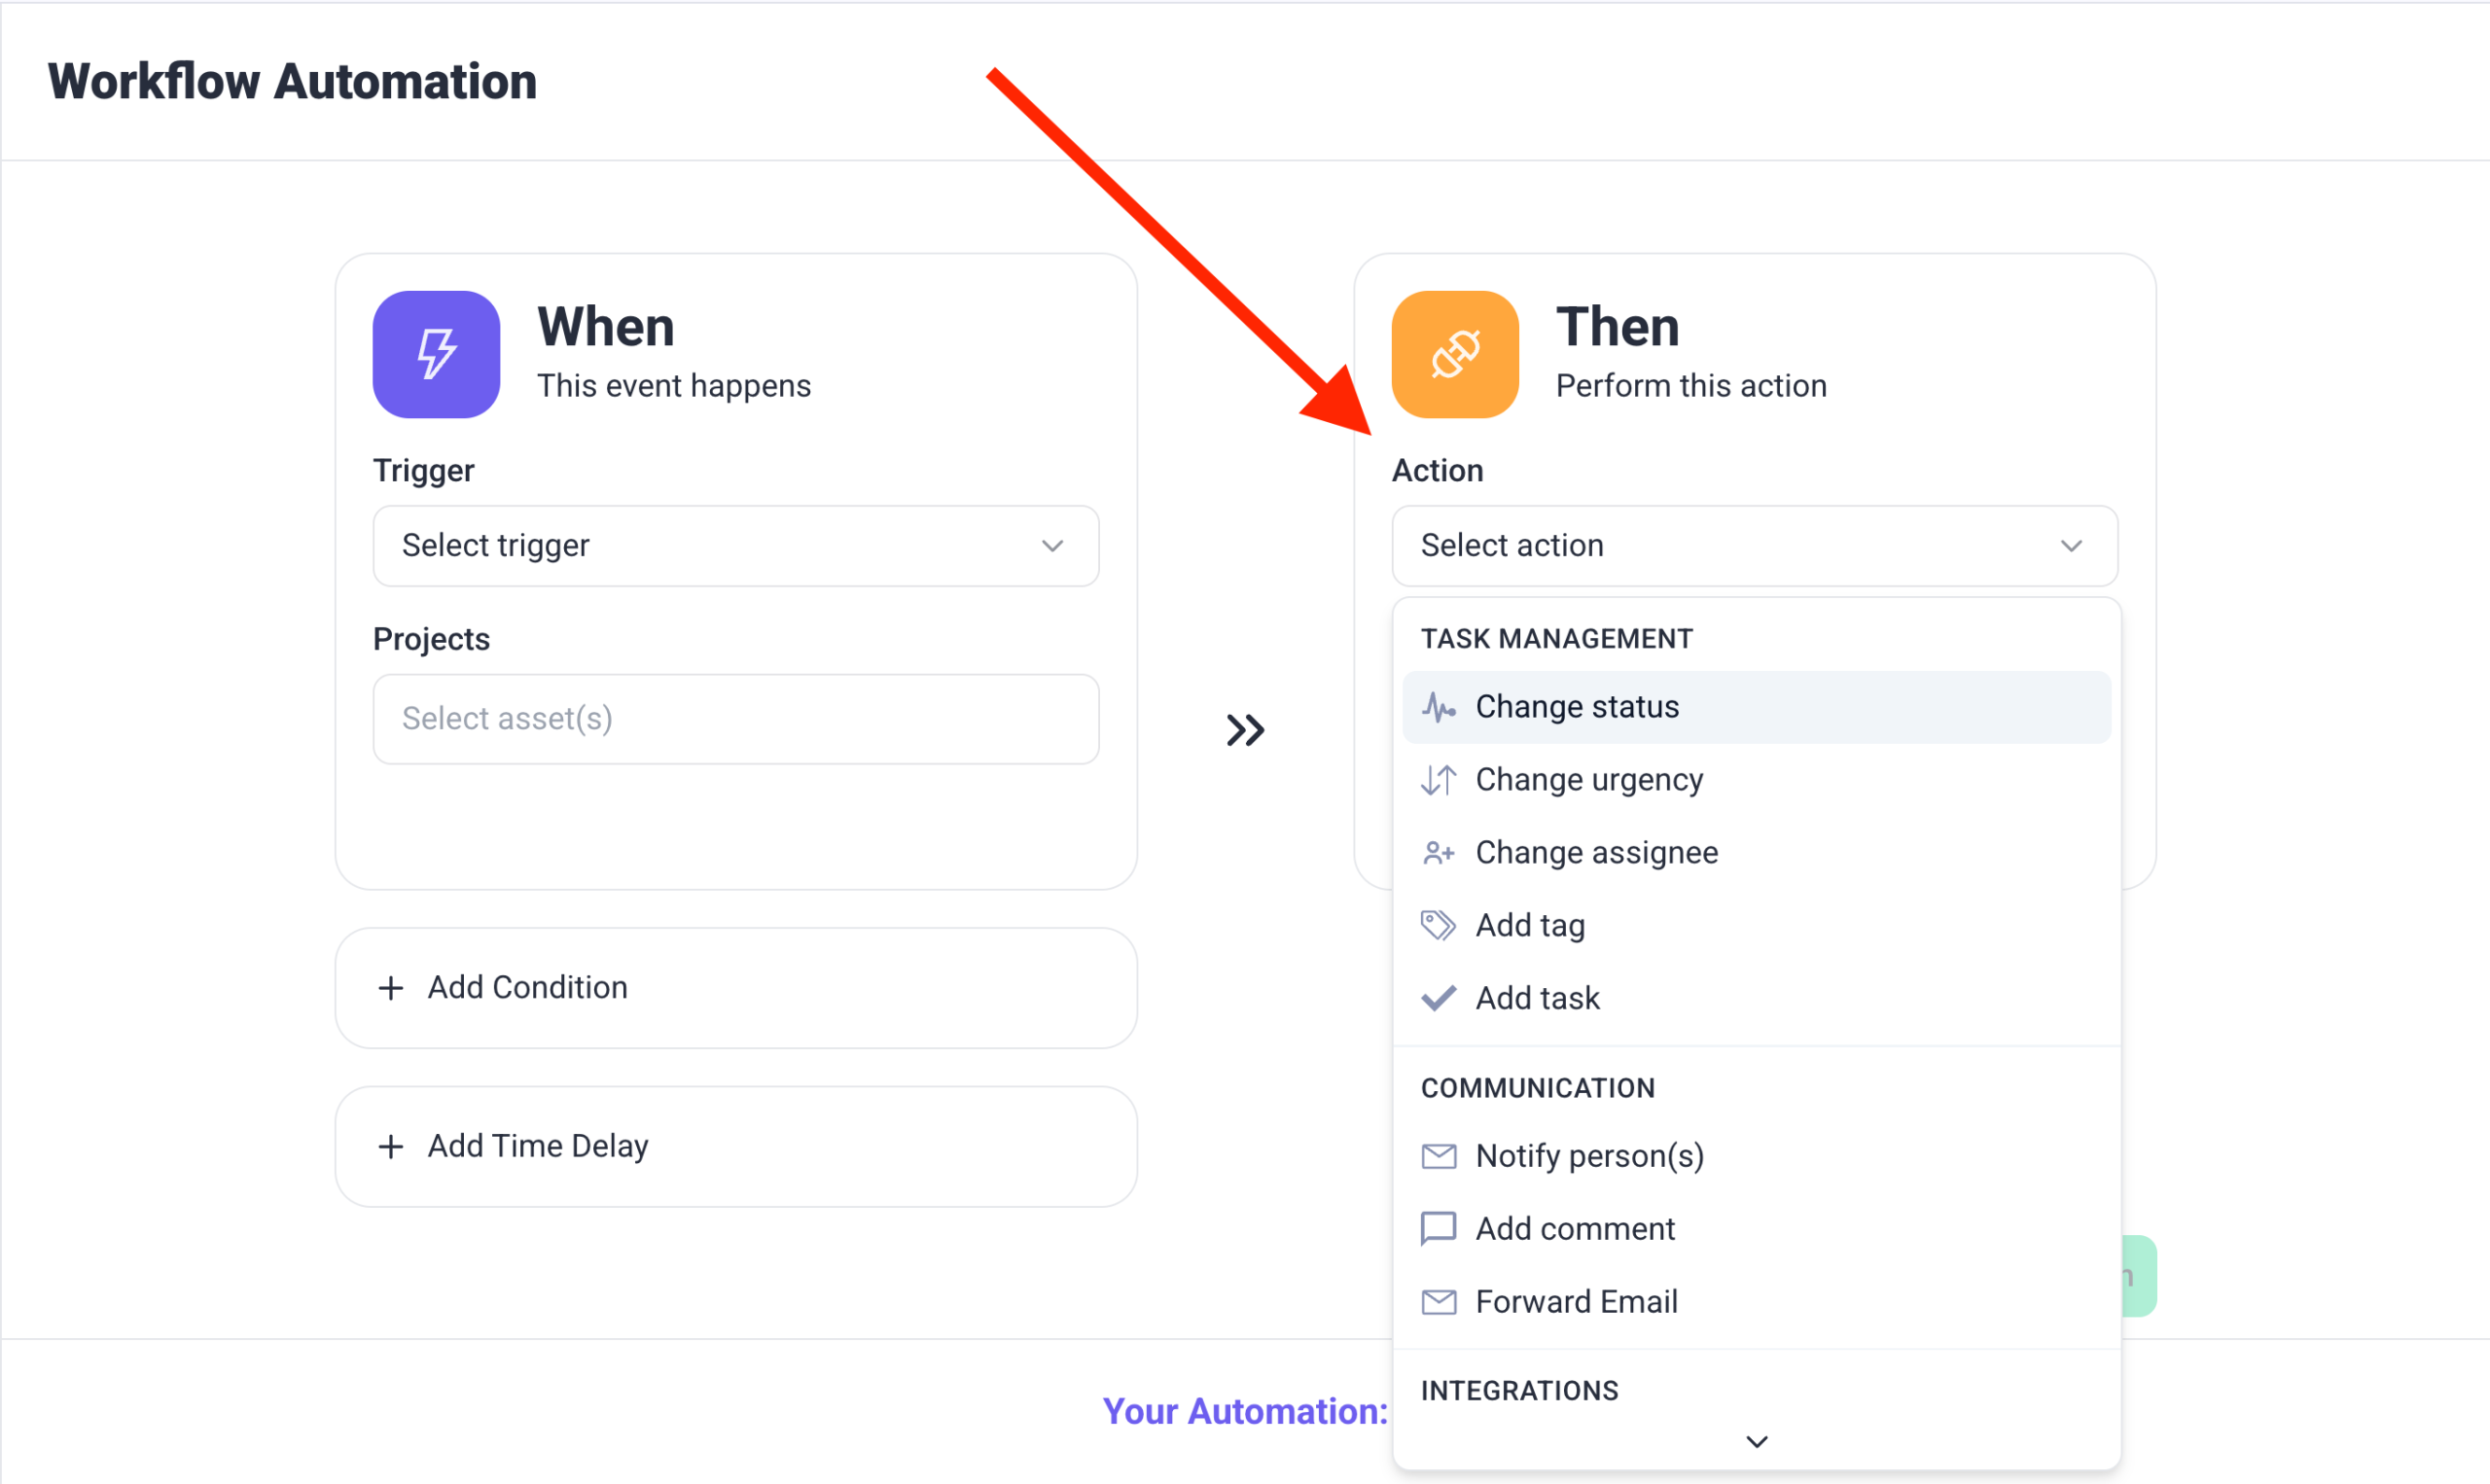
Step 3: Set Triggers and Actions
- Set a Trigger – This defines when the automation starts
- Example: Task Status Changes to “In Progress.”
- Set an Action – This defines what happens when the trigger occurs
- Example: Notify Team Members via email or Atarim notification
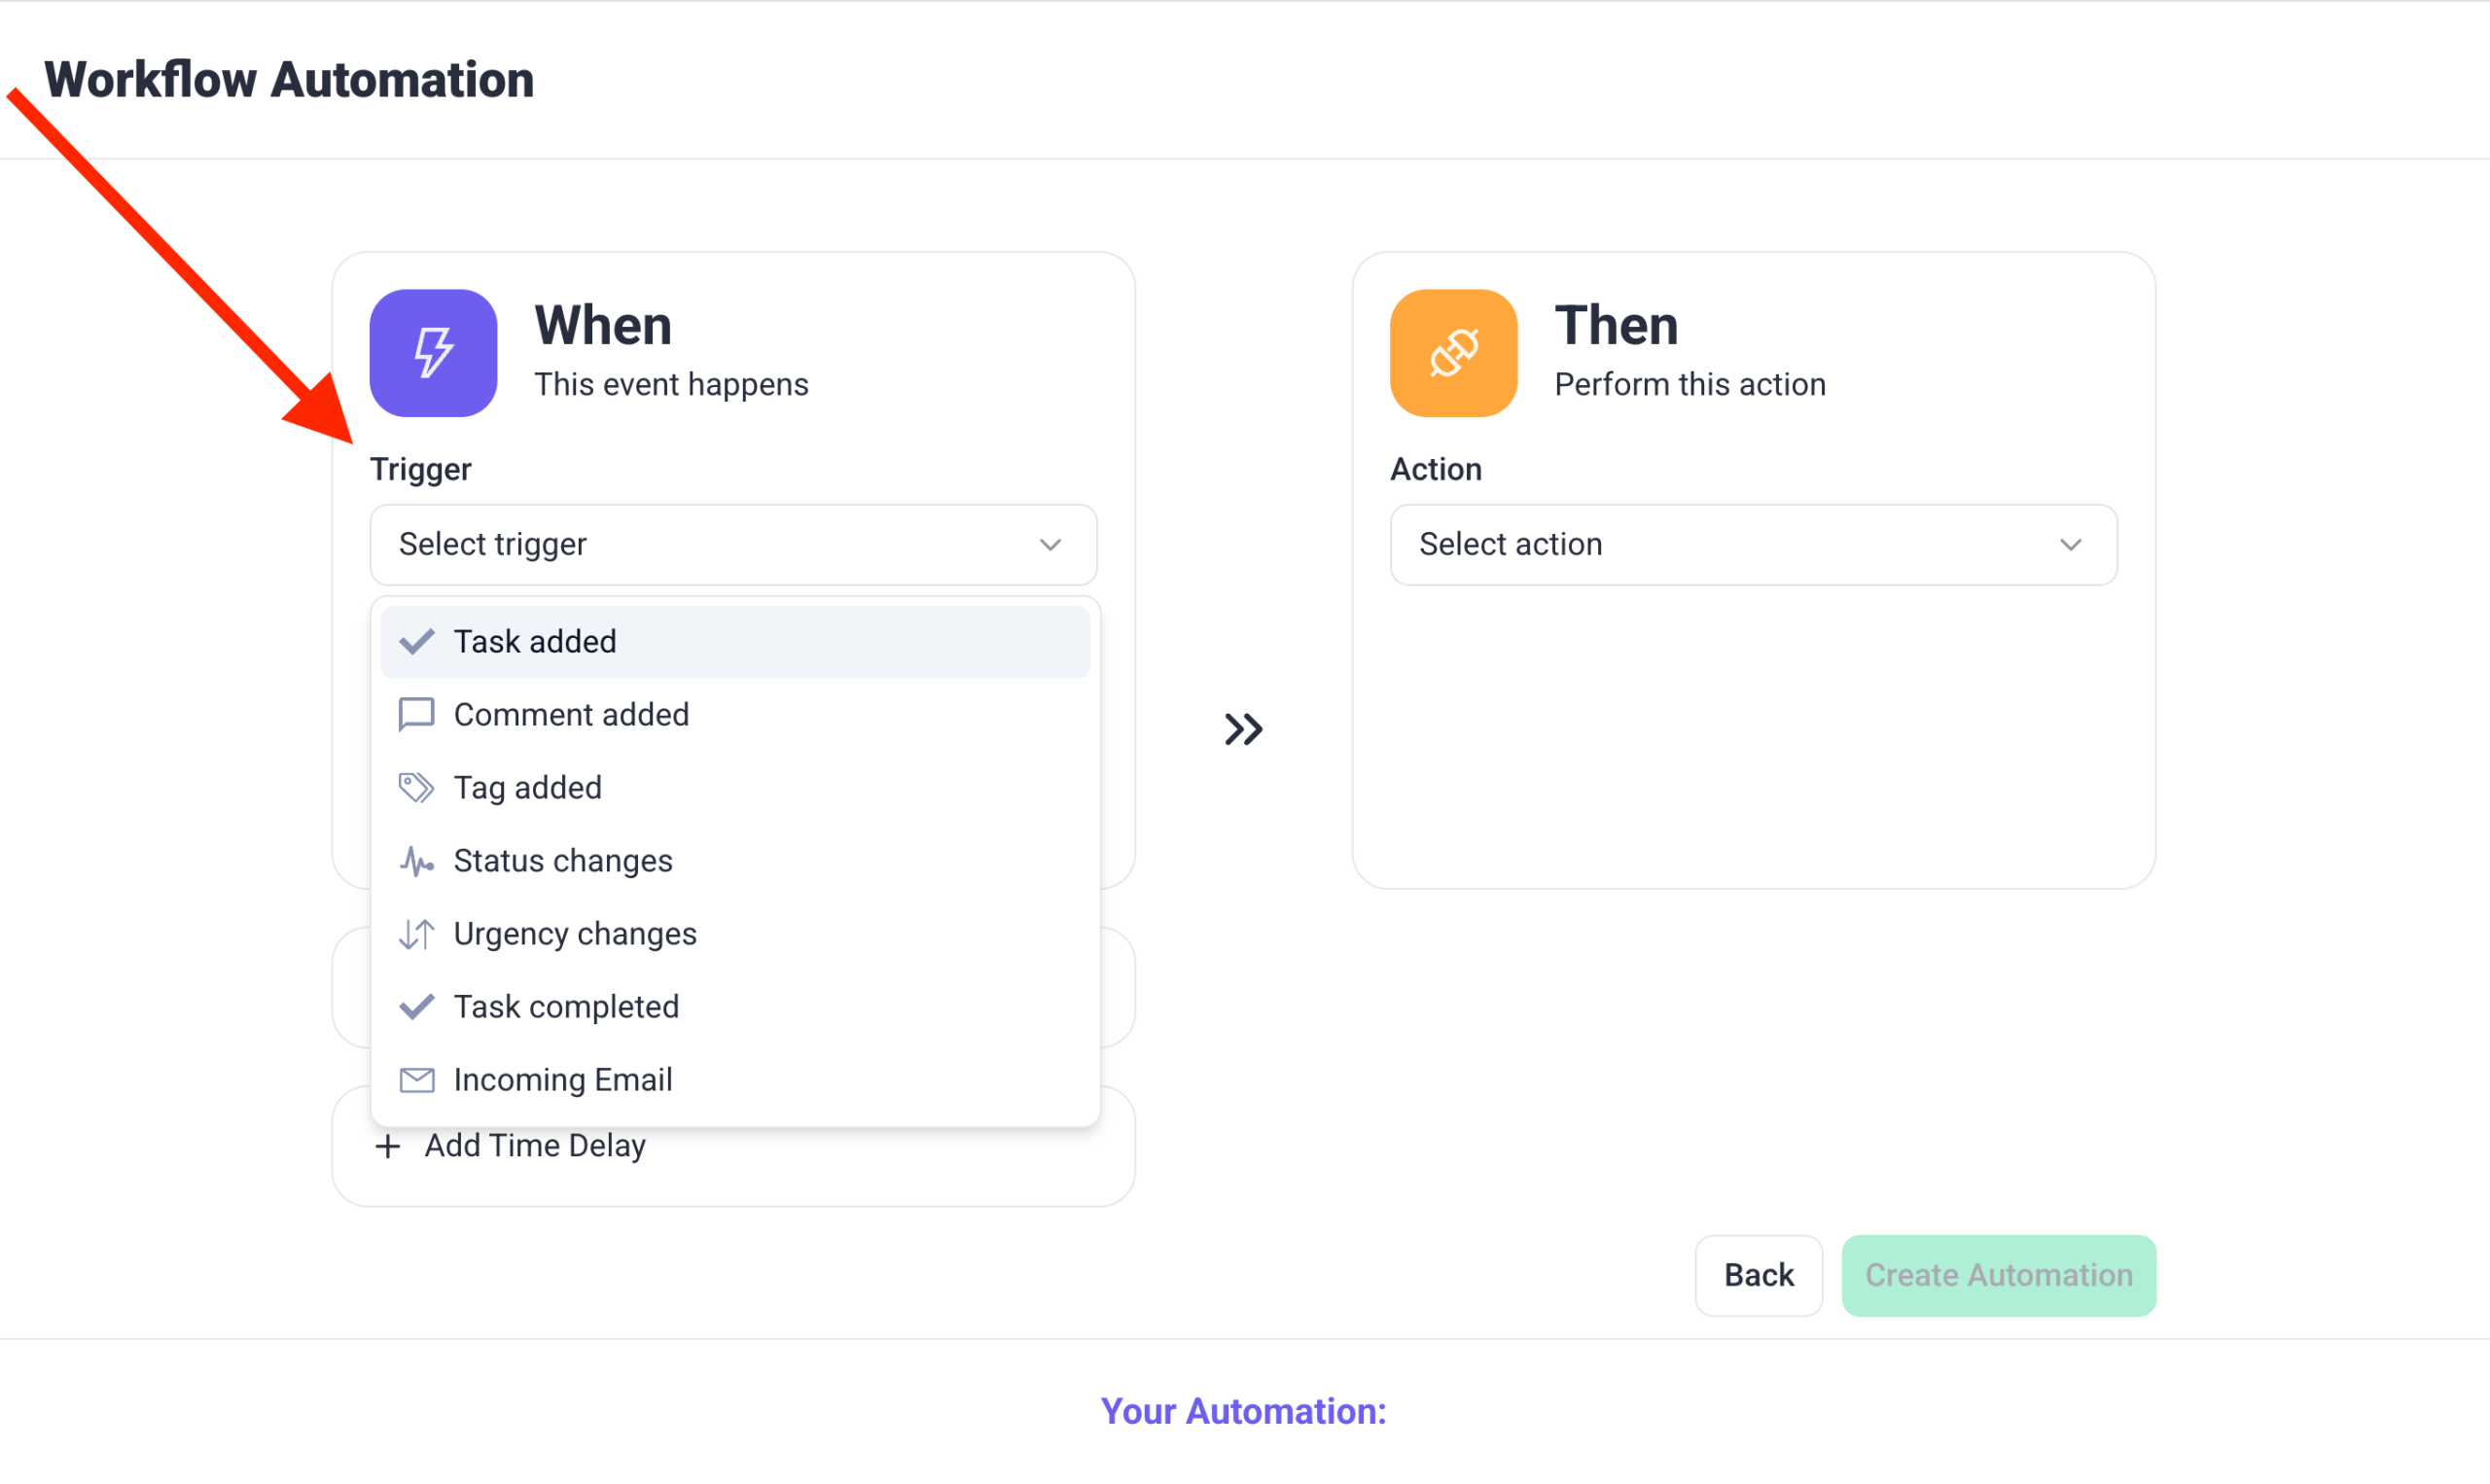
Note: You can create multi-step automations for complex workflows, such as sending Slack notifications and updating a Jira board simultaneously.
Tip: Use multiple triggers to create advanced automations, like updating multiple team members at once!
Using Time Delays in Workflows
Time Delays allow you to trigger automated actions in Atarim after a set amount of time has passed. This feature helps you manage idle tasks, send reminders, and ensure nothing slips through the cracks — all without manual follow-up.
What Is Time Delay?
Time Delays are workflow conditions that wait for a specific amount of time (hours, days, or weeks) before triggering a follow-up action. They help automate actions based on inactivity or delayed responses, improving your team’s response rate and ensuring accountability.
How to Set a Time Delay in a Workflow
- From your Atarim dashboard, go to Workflows.
- Click Custom Automation, or select an existing automation to edit.
- Set the Trigger and choose the relevant Project.
- Add a Condition, if needed.
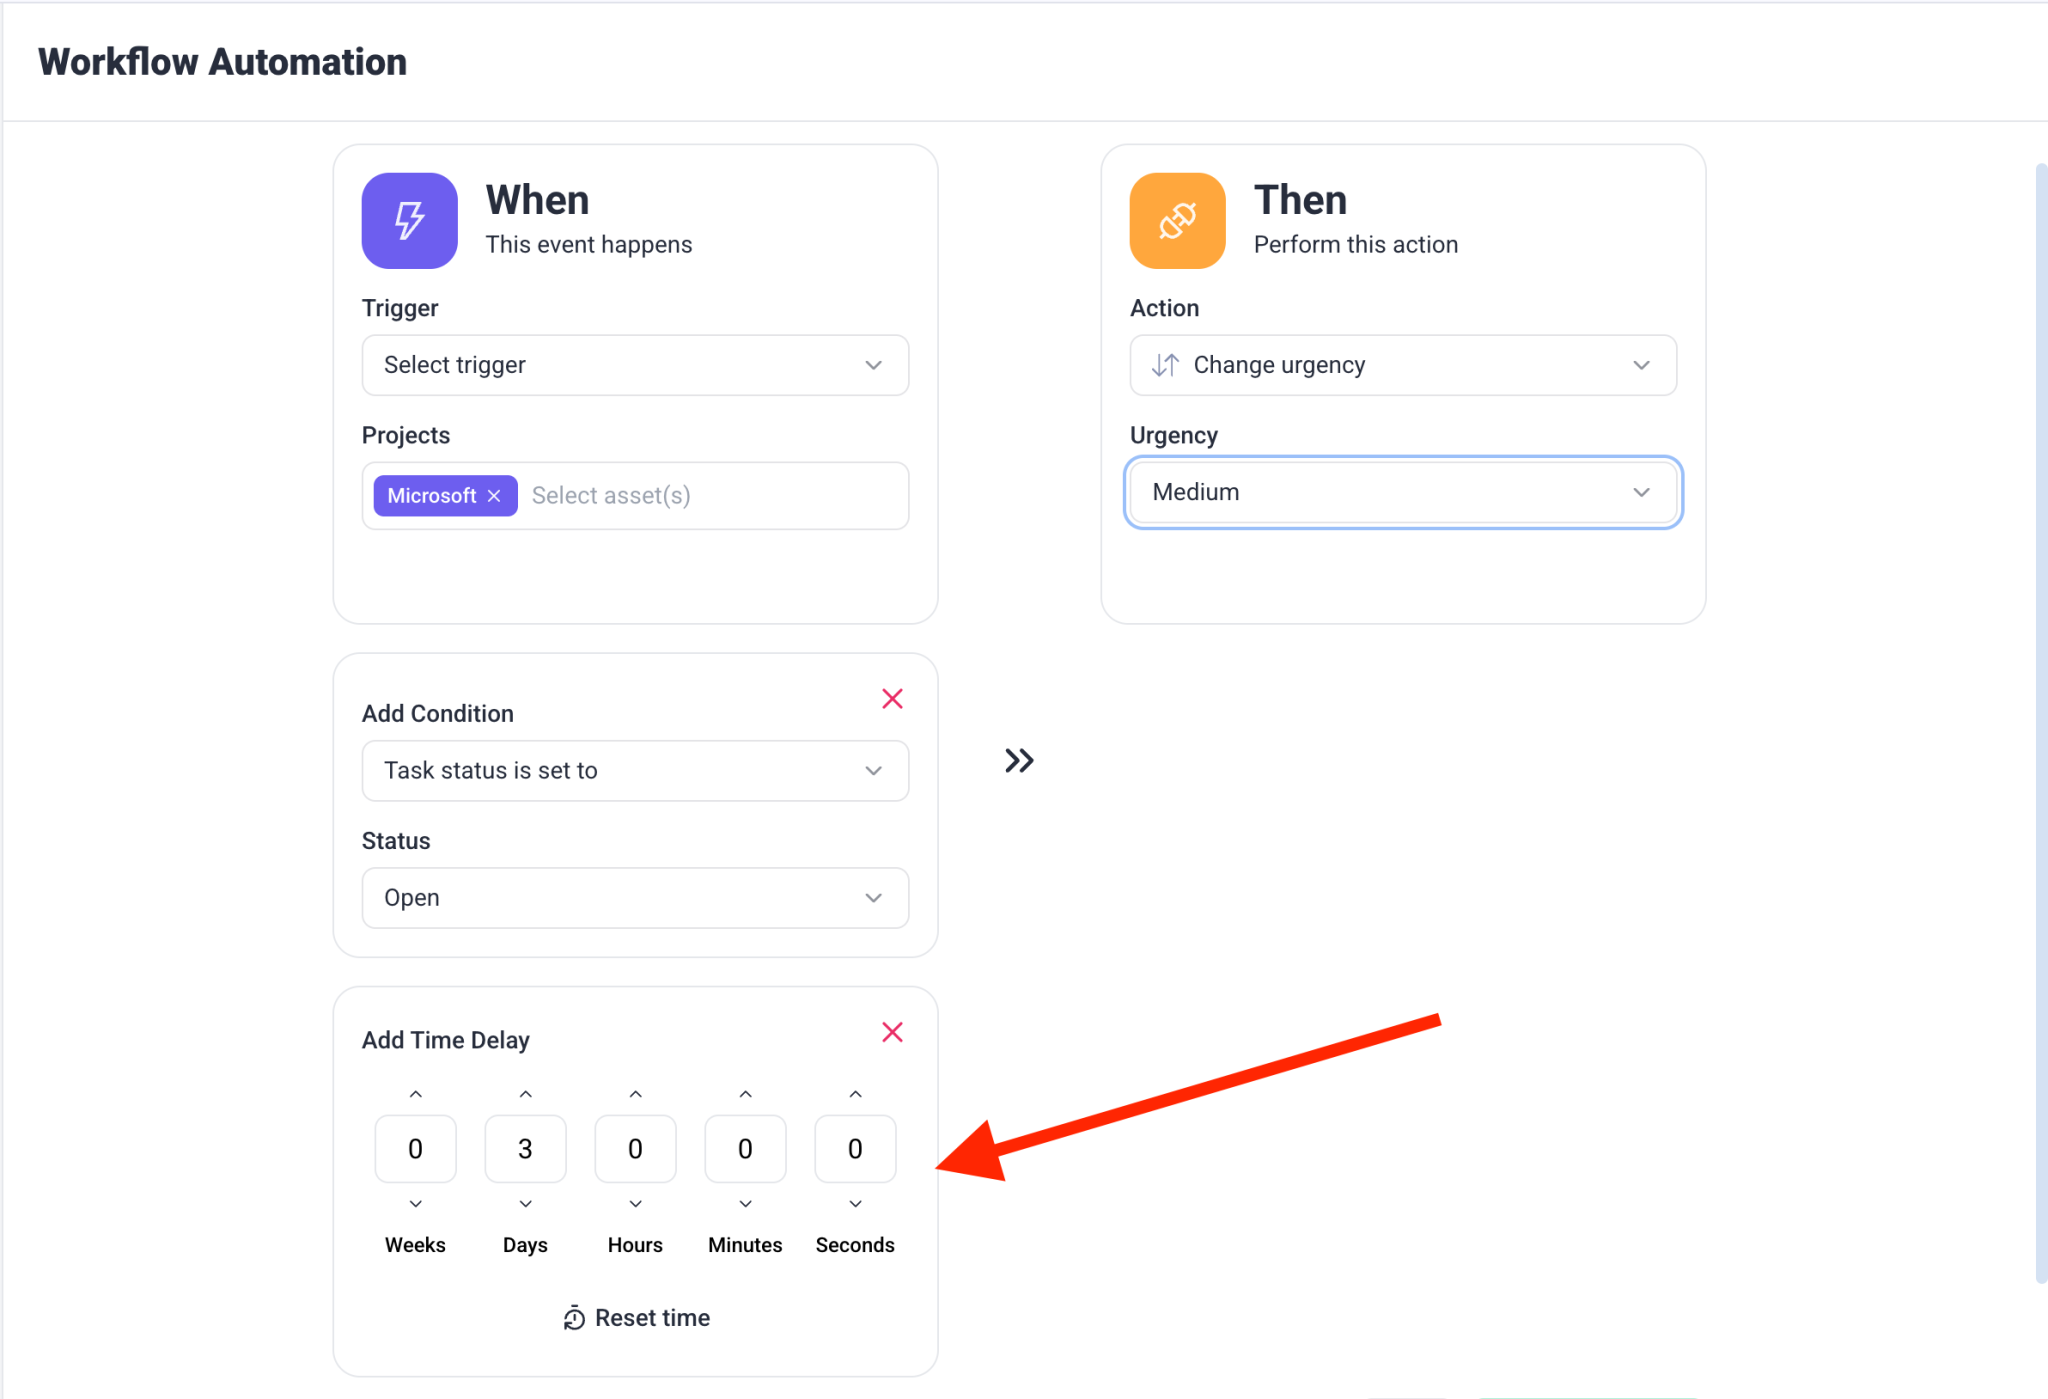
- Under Add Time Delay, set your preferred delay (for example: 2 days, 5 hours, or 1 week).
- Add the Action that should occur after the delay, such as:
- Posting a comment
- Sending a reminder
- Changing the task status
- Click Save and Activate your workflow.
Example Use Case
A. Escalate Inactive Tasks
Automatically update the task status if it hasn’t been touched in several days.
Workflow Example:
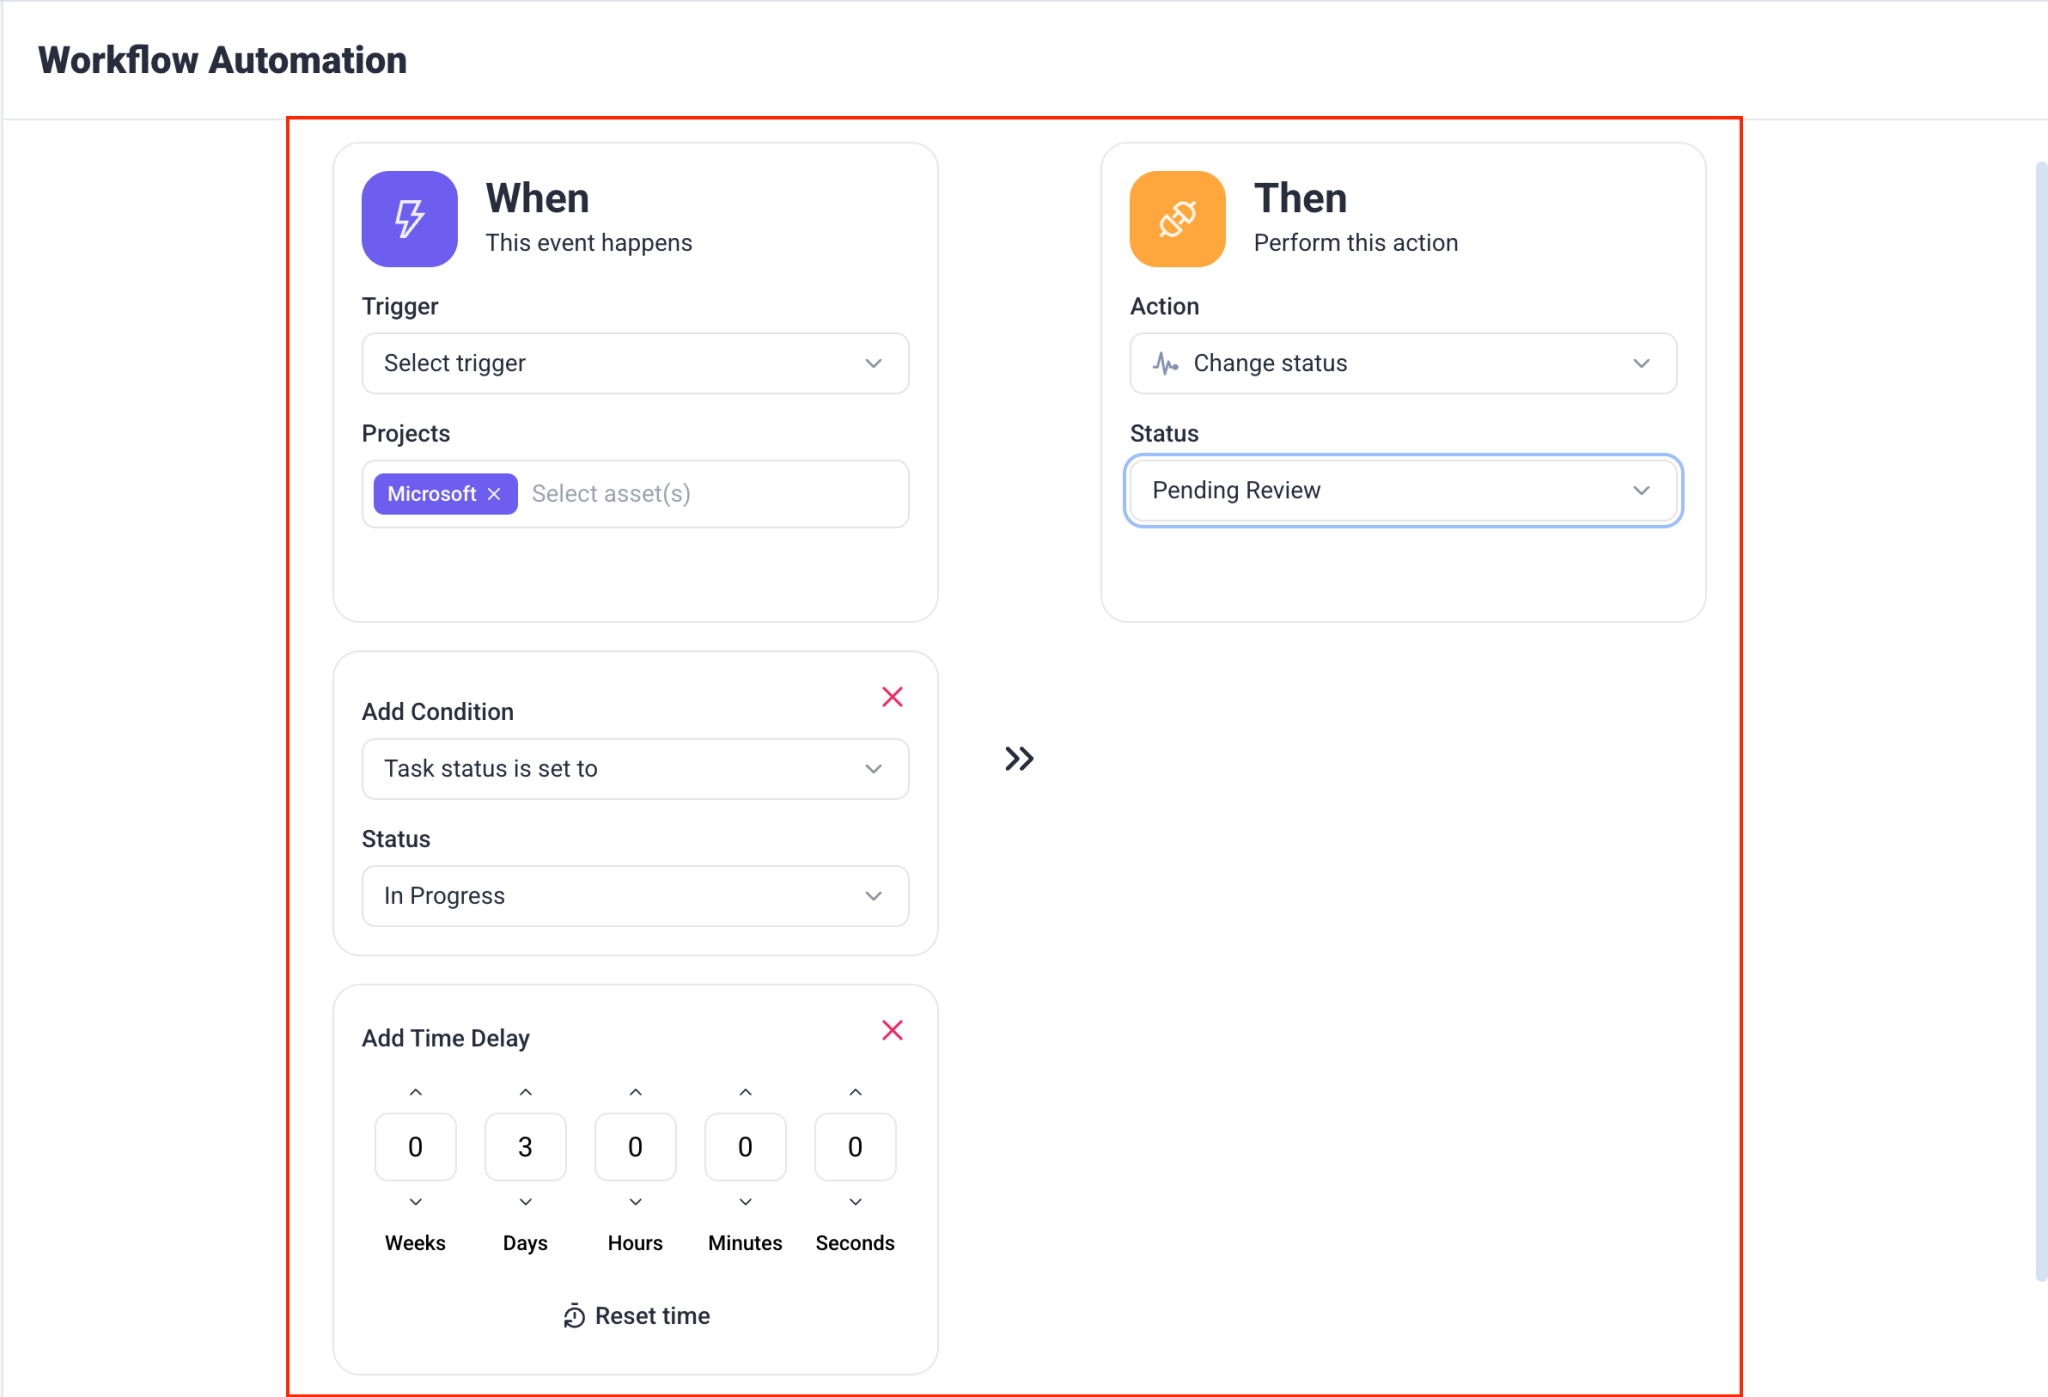
- Trigger: Task status is “In Progress”
- Delay: 3 days
- Action: Change status to “Pending Review” and notify the assignee
B. Send Reminder Comments to Clients
Send a gentle nudge when waiting on a client reply.
Workflow Example:
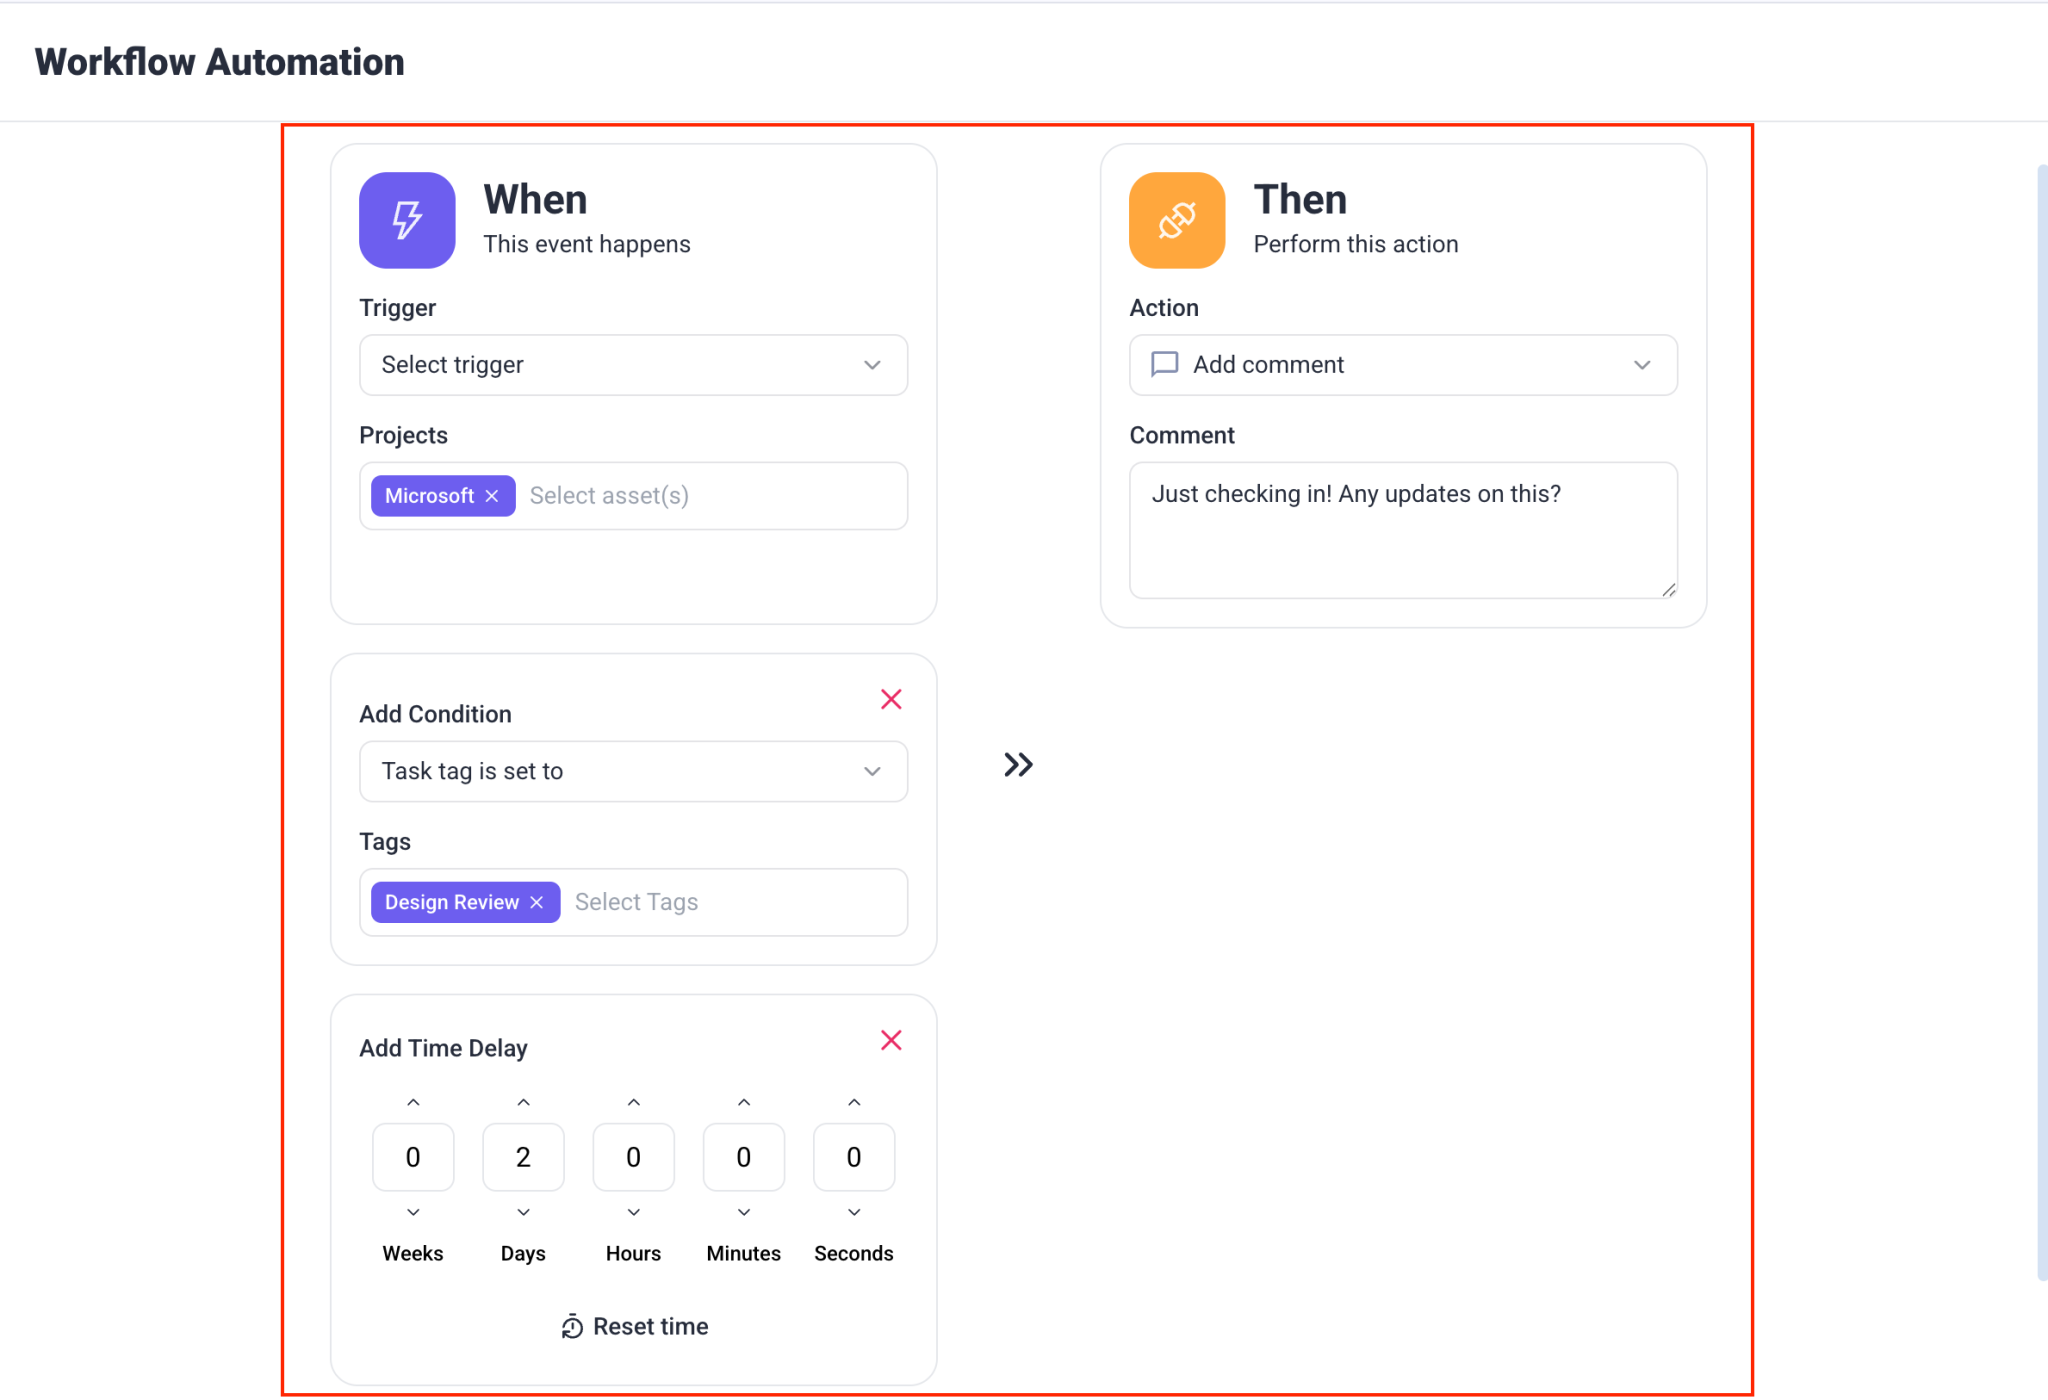
- Trigger: Task is tagged “Design Review”
- Delay: 2 days
- Action: Add comment — “Just checking in — any updates on this?”
C. Follow Up with Team Members
Keep internal tasks moving by prompting your team after delay periods.
Workflow Example:
- Trigger: Task assigned to a team member
- Delay: 5 days
- Action: Add internal comment — “Still pending, please update if you’re blocked.”

Step 4: Review and Save Your Automation
- Review the automation summary displayed at the bottom.
- Click Create Automation to save and activate your workflow.
Note: After saving, your automation will be listed in the Workflows dashboard, where you can edit or disable it anytime.
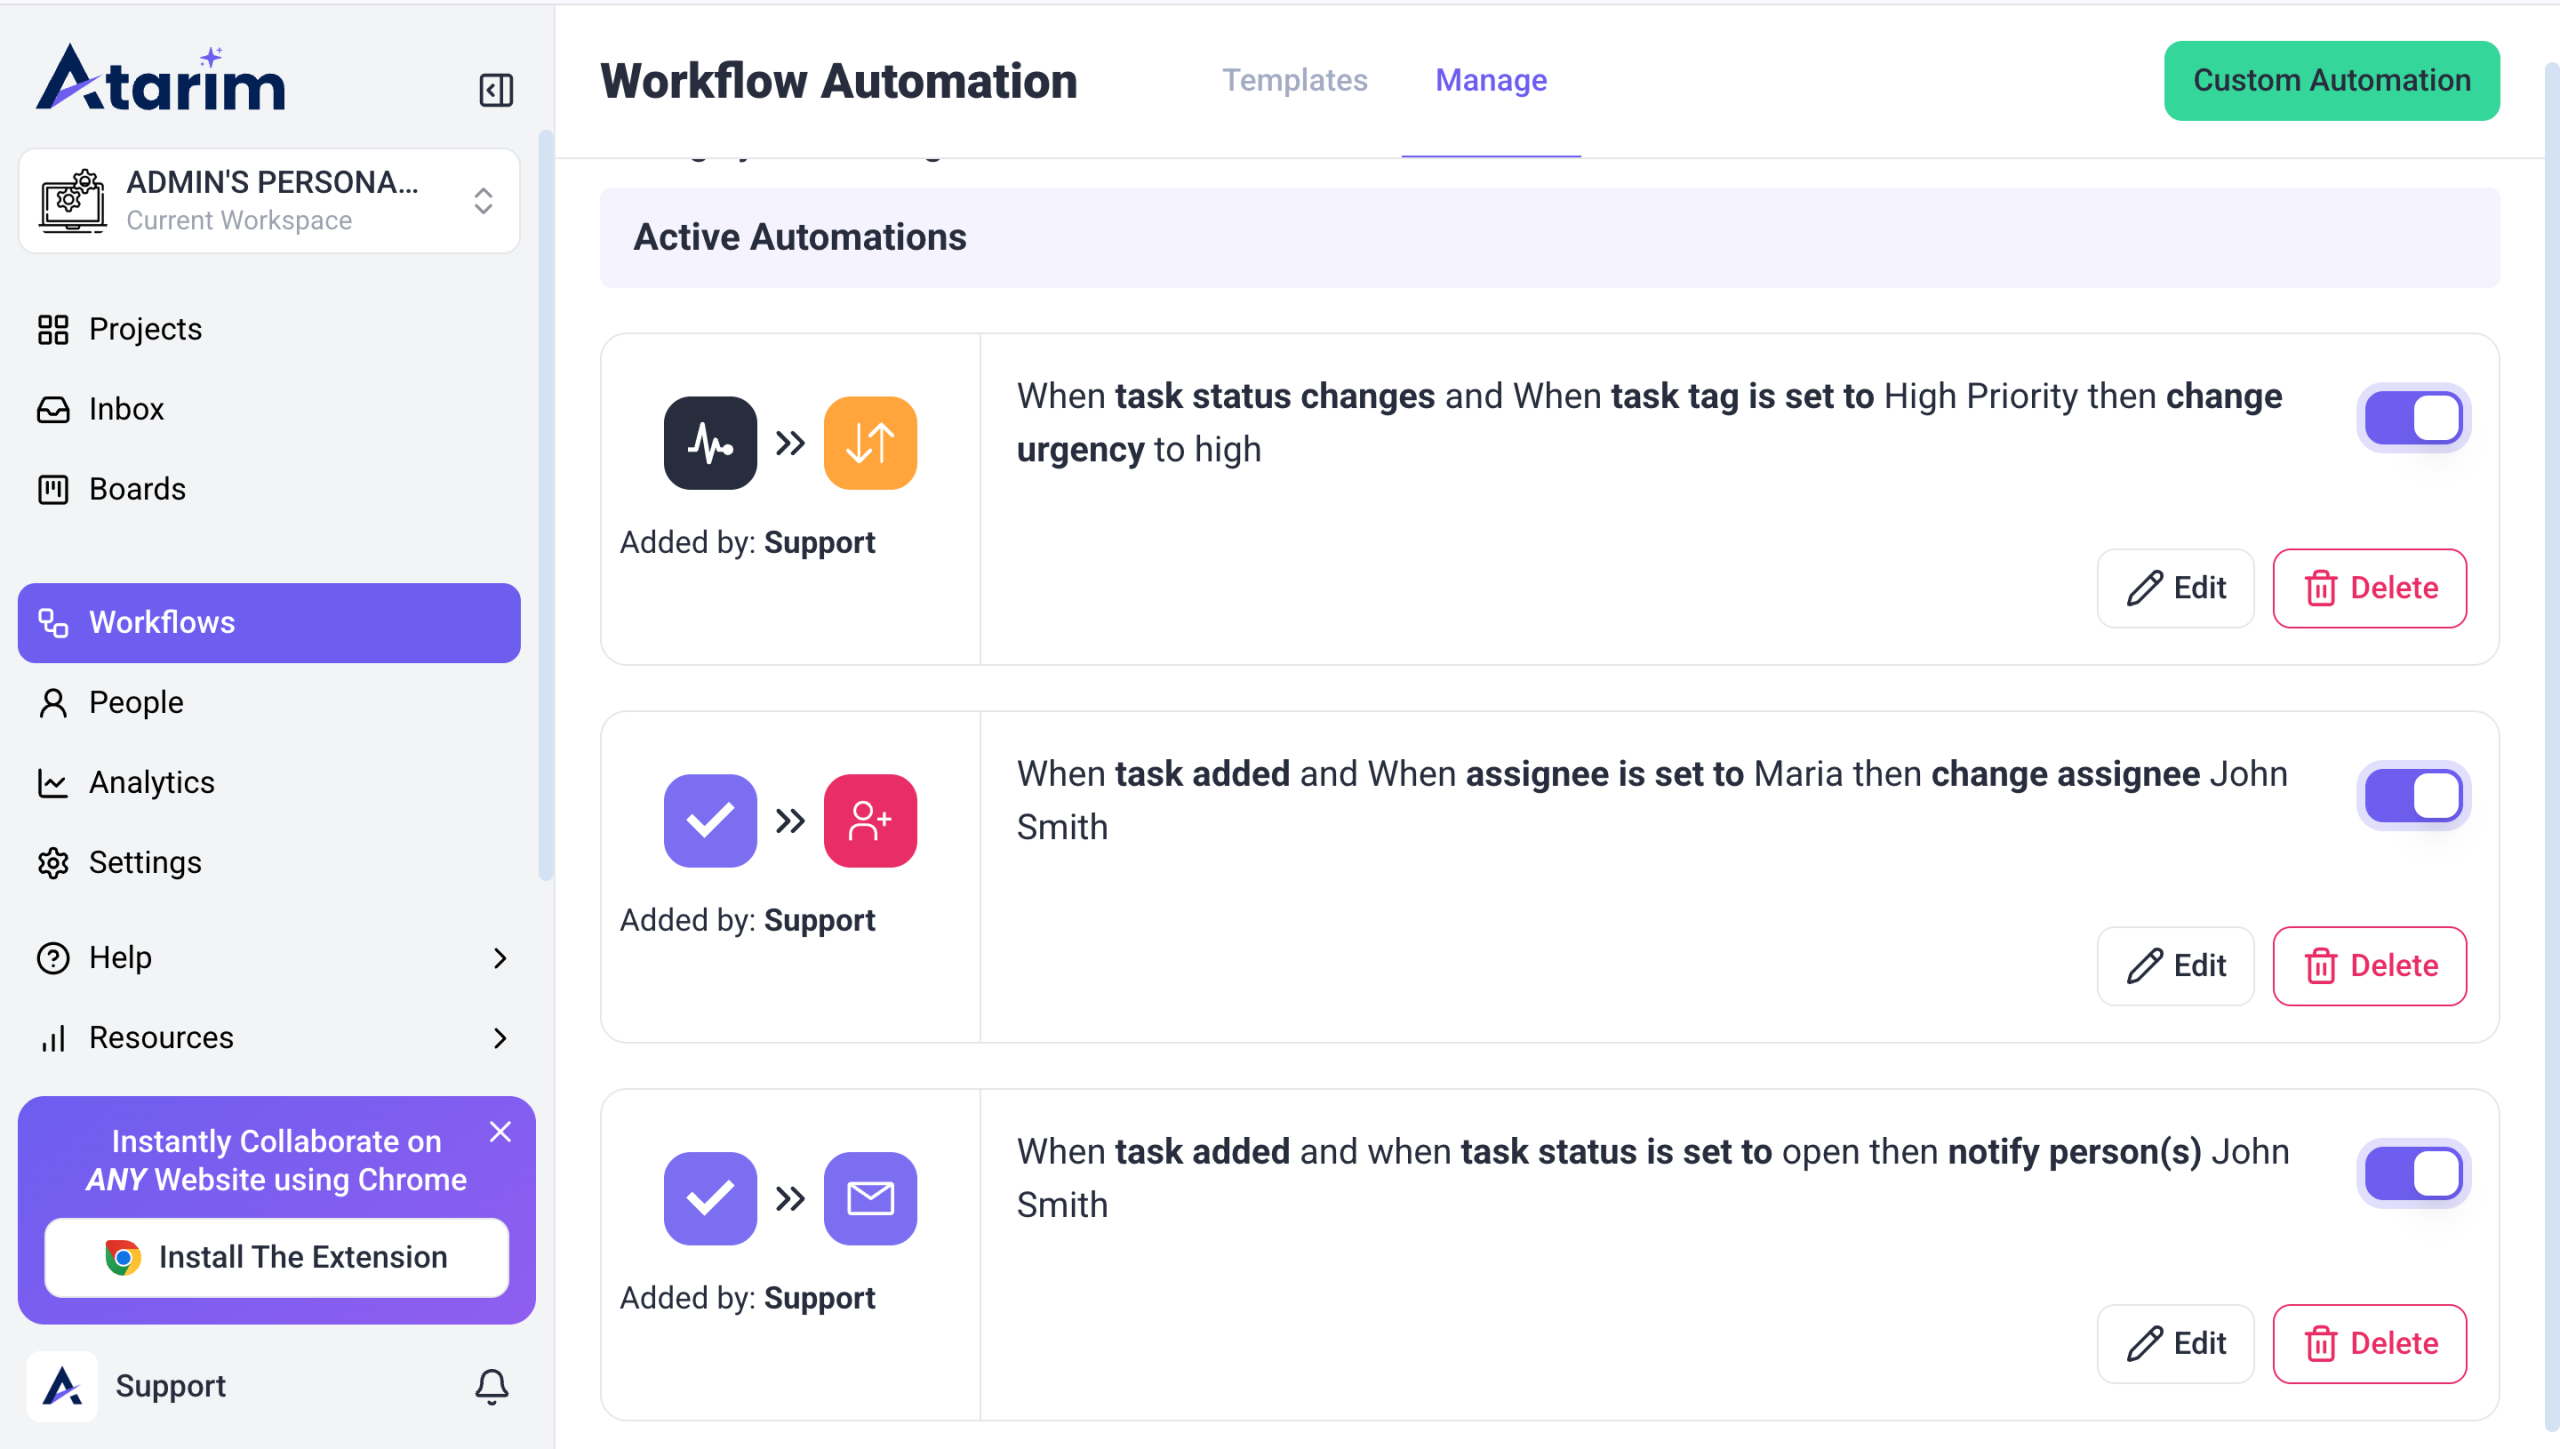
Automation Categories
Atarim organizes workflow automations into categories based on what triggers the automation. Each category helps you automate actions when specific events happen inside your workspace, keeping your workflow efficient and consistent.
1. Task
Task automations trigger when a task is created in Atarim. This is ideal for keeping external tools and internal teams in sync as work moves forward.
Available triggers:
- Task added
Example:
Automatically add a task to ClickUp when a task is created in Atarim.
2. Comment
Comment automations trigger when a new comment is added to a task. These are especially useful for managing feedback from clients or teammates and ensuring nothing gets missed.
Available trigger:
- Comment added
Example:
Automatically change a task’s status to Pending Review when a comment is added.
3. Tag
Tag automations trigger when a tag is added to a task. Tags help organize work, and automations allow you to take action instantly based on those tags.
Available trigger:
- Tag added
Example:
Send a tagged task to Jira or Basecamp when a specific tag is applied.
4. Status
Status automations trigger when a task’s status changes. These automations help ensure that progress updates automatically trigger the next step in your workflow.
Available trigger:
- Status changes
Example:
Create a Trello card when a task status changes to In Progress.
5. Priority / Urgency
Priority (Urgency) automations trigger when a task’s urgency level changes. This helps teams respond quickly to high-priority or critical tasks.
Available trigger:
- Urgency changes
Example:
Notify assigned team members when a task is marked as Critical.
6. Task Completed
Task Completed automations trigger when a task is marked as done. These are useful for closing loops, updating external tools, or notifying stakeholders.
Available trigger:
- Task completed
Example:
Notify the project manager when a task is completed.
7. Incoming Email
Incoming Email automations trigger when a specific email is received. This allows you to turn emails into tasks or trigger actions automatically, without manual input.
Available trigger:
- Incoming Email
Example:
Create a task in Basecamp when an email is received from a specific sender.
Creating Custom Automations for HTTP action
Custom Webhooks allow Atarim to send a fully configurable payload to a third-party URL when a task-related event is triggered. This gives you flexibility to connect with services that aren’t supported via Zapier, Make.com, or other native integrations.
You define:
- The URL to send data to
- The structure of the payload
- Where task data should be inserted
When Should You Use Custom Webhooks?
Use this feature when:
- You need full control over the webhook payload and structure.
- You want to trigger automations in tools without existing Atarim integrations.
- You’re building your own middleware or handling automations server-side.
How to Set Up a Custom Webhook
Step 1: Test with Webhook.site (Recommended for First-Time Setup)
- Go to https://ancillary-proxy.atarimworker.dev?url=https%3A%2F%2Fwebhook.site
- Copy the temporary webhook URL provided at the top of the page

Tip: Webhook.site gives you a real-time view of what’s being sent—perfect for testing payload structure.
Step 2: Configure Your Webhook in Atarim
- Open your Atarim Dashboard
- Go to Workflows
- Click on Create Custom Workflow
- Define the Trigger and Action
- Choose Send HTTP request
- Paste the webhook.site URL into the “URL” field
- Add your Custom Payload
- Click on Save
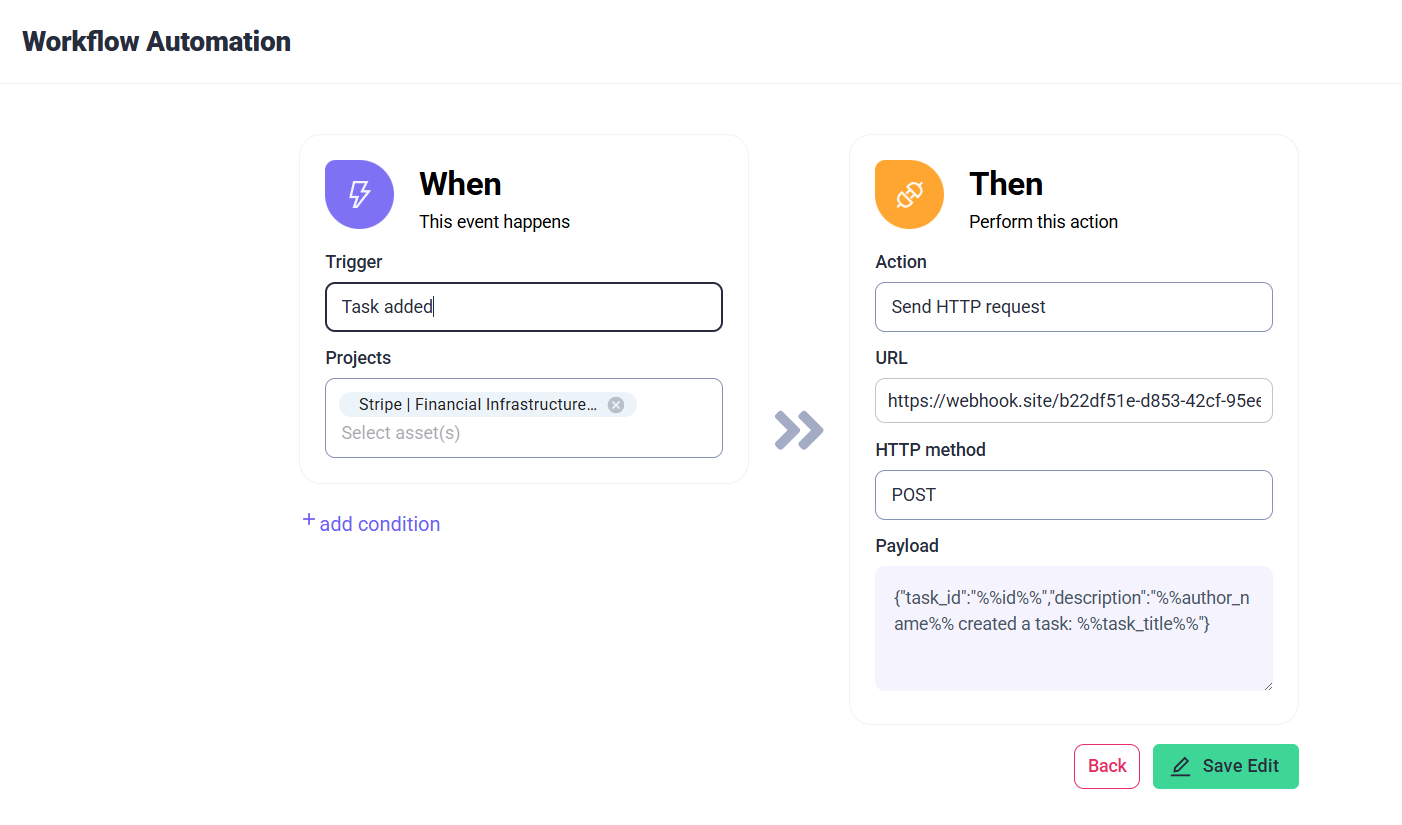
Step 3: Write Your Custom Payload
You can define the payload in JSON format and include dynamic placeholders surrounded by double percentage signs. (e.g. %%title%%).
Example 1 – Static Payload
So if we have a payload like this:
{ "test": "hello" }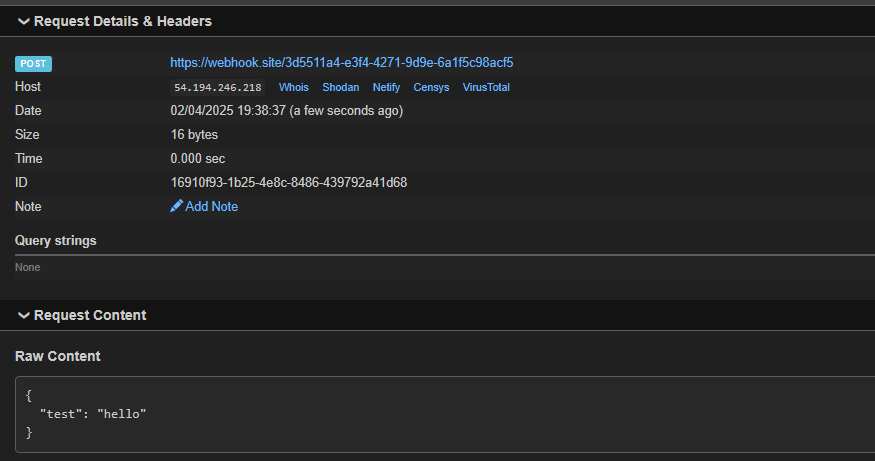
This will send the exact same payload to your target service for every task. No task-specific data will be included.
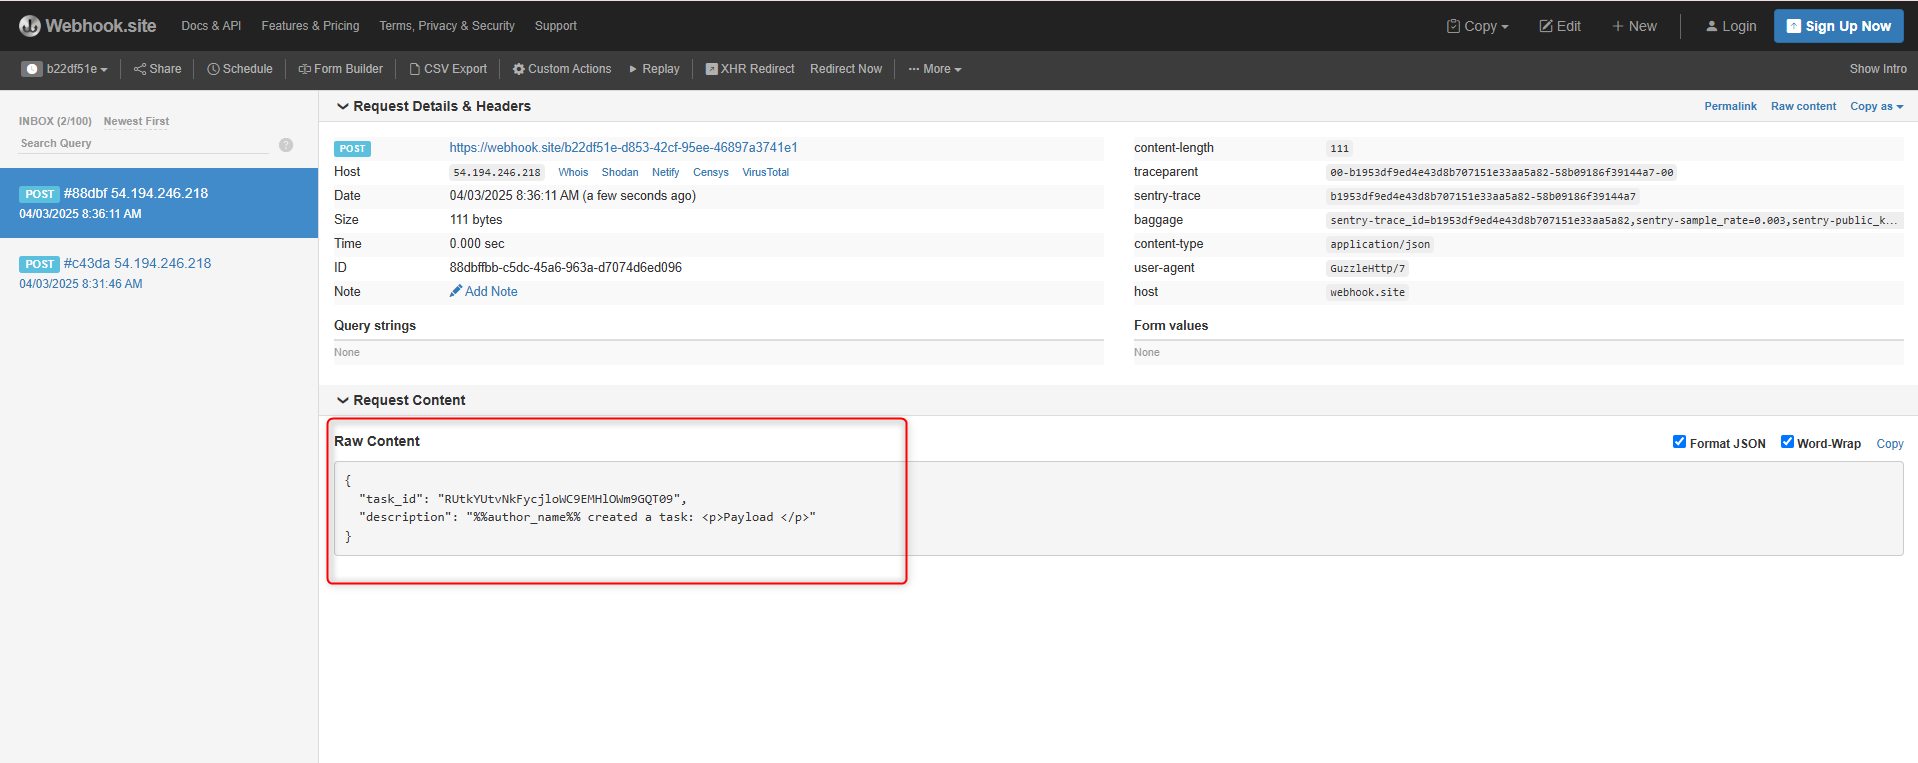
Example 2 – Dynamic Payload including Task Title, ID, Created At, and Screenshot.
But if we have a payload like this:
{
    "TASK DETAILS": "Task id: %%id%%, site id: %%site_id%%",
    "TASK TITLE": "Task %%task_title%% was created at %%created_at%%",
    "SCREENSHOT": "%%screenshot%%"
}
If a task is created with the title “Please update this”, the payload will be:

Example 3 – Mixed Static and Dynamic Data
We can put that dynamic content wherever we want, with any other text we want, so we could also do something like this:
{
"test": "hello this is a task with the title: %%title%%"
}
Supported Dynamic Task Attributes
You can insert any of the following dynamic placeholders into your JSON payload:
| Placeholder | Description |
|---|---|
| %%id%% | Task ID |
| %%title%% | Task title |
| %%status%% | Task status (e.g. open, in-progress) |
| %%priority%% | Task priority (e.g. low, critical) |
| %%site_id%% | ID of the site/project |
| %%message%% | Task description or content |
| %%created_at%% | Timestamp when task was created |
| %%assigned_user%% | User assigned to the task |
| %%screenshot%% | Screenshot |
Tip: You can mix and match these inside your payload anywhere dynamic content is required.
Example Use Cases
- Sending a task summary to a custom-built internal dashboard
- Logging task events to a database via a serverless function
- Notifying a custom Slack app with specific formatting
- Triggering automation in services like Pipedream or n8n
Testing and Validation
- Create a test task in Atarim.
- Check your Webhook.site URL to see the payload delivered.
- Review whether the dynamic placeholders were replaced correctly.
- Modify the payload as needed and retest.

Tip: Once your test works correctly in Webhook.site, replace the URL with your live endpoint.
Send HTTP Payloads for Task Comments in Atarim
When interacting with comment data in Atarim via HTTP, you can use the following structure to organize and transmit relevant information. The placeholders below should be dynamically replaced by actual data at runtime.
Sample Payload
{
    "task_info": "Task ID: %%id%%, Site ID: %%site_id%%, Priority: %%priority%%, Status: %%status%%",
    "author_details": "Author: %%author_name%%, Task Title: %%title%%",
    "page_info": "Page URL: %%page_url%%, Page Title: %%page_title%%",
    "comment_details": "Comment ID: %%comment_id%%, Comment Message: %%comment_message%%",
    "task_timing": "Created At: %%created_at%%, Updated At: %%updated_at%%",
    "screenshot": "Screenshot: %%screenshot%%"
}
Placeholder Breakdown
| Placeholder | Description |
|---|---|
| %%id%% | Unique ID of the task |
| %%site_id%% | ID of the site where the task resides |
| %%priority%% | Task priority (e.g., High, Medium, Low) |
| %%status%% | Task status (e.g., Open, In Progress, Done) |
| %%author_name%% | Name of the user who created the task |
| %%title%% | Title of the task |
| %%page_url%% | URL of the page where the task is located |
| %%page_title%% | Title of the page where the task is located |
| %%comment_id%% | Unique ID of the comment |
| %%comment_message%% | The actual message left in the comment |
| %%element_path%% | DOM path to the specific element commented on |
| %%created_at%% | Date and time when the task was created |
| %%updated_at%% | Date and time when the task was last updated |
| %%screenshot%% | Screenshot URL associated with the task or comment |
Configure Your Webhook in Atarim
- Open your Atarim Dashboard.
- Go to Workflows
- Click on Create Custom Workflow
- Define the Trigger and Action
- Choose Send HTTP request
- Paste the webhook.site URL into the “URL” field.
- Add your Custom Payload
- Click on Save


FAQs
Yes, go to Workflows, find your rule, and click Edit.
In the Workflows list, toggle the automation off to disable it.
Yes, Atarim supports Jira, ClickUp, Basecamp, and more for seamless automation.
This depends on how you configure the workflow. Any supported trigger that includes this webhook option will send the payload when it fires.
Unsupported placeholders will be sent as-is remains unchanged in the payload).
Yes! You can set up different workflows with different URLs and payloads.
Once a Time Delay has been triggered, it will run its course unless the workflow rule is manually disabled or conditions change. Delays are based on real-time activity at the time of the trigger.